
Last Updated on March 1, 2024
External hard drive suddenly stops working on Mac? The problem might be caused by improper human operations. For example, you unplugged the hard drive without safely ejecting it from the computer.
It also could result from unexpected interruption during data transferring such as sudden power-off and sudden disconnection between the disk and the computer. In addition, it could be disk corruption as a consequence of a corrupted file system or virus infections. The worst scenario could be that the hard drive is physically broken.
Well, no matter what caused the trouble, here are some basic checks and working fixes for you to make your external hard drive work on Mac again.
Do basic checks
Believe it or not, the very first step for troubleshooting the problem is to check if there is a poor or even broken connection between the external hard drive and the Mac.
- Push the USB cord into the USB port hard to make sure it is connected properly and firmly.
- Change the USB cord or USB port to test if they are worn.
- Connect the external hard drive to another Mac or Windows PC to see if it is working correctly.
After all basic checks, you should know if the external hard drive is physically damaged and if the connection is trustworthy. If you believe that everything works well but the external hard drive doesn’t work properly on the Mac, the next step is to go to Mac’s Disk Utility to fix the problem.
Check Disk Utility

Disk Utility is a built-in application on Mac which helps you manage internal and external storage devices. It can perform a lot of useful actions. For instance, you can use it to mount, unmount, partition, format a disk or a volume as well fix minor disk errors.
All detected disks will be listed in the left panel in Disk Utility. If the disk is not successfully mounted, it will be greyed-out.
If you are facing a greyed-out external hard drive, you probably have the same problem that the external hard drive doesn’t show up on Mac properly. It means you won’t see the hard drive on the desktop nor in the Finder.
To make the Mac mount the external hard drive successfully, try solutions below one by one.
Solution 1: Mount the external hard drive using Mount option
Mounting is a process by which the operating system read, recognize, and process the file system structure and metadata on a storage device. After the operating system successfully mounts a storage device, the storage device like an external hard drive, an SSD, or USB flash drive and its files will be accessible to a user. In generally, macOS will automatically mount attached internal and external disks. But there is a possibility that the external hard drive needs mounting manually.
- Select the non-mounting external hard drive.
- Click on “Mount” in the toolbar.
If the Mac still cannot mount the disk successfully, some disk errors might stop the disk from mounting. Luckily, you can try to repair the errors in Disk Utility too.
Solution 2: Run First Aid to fix the disk errors

First Aid is a utility included in Mac’s Disk Utility for checking and repairing file system errors. It can detect and try to repair the errors in partition map, device driver, boot blocks, master directory block, volume bitmap, etc.
- Select the non-mounting external hard drive.
- Click on “First Aid” in the toolbar.
- Click on the “Run” button.
If the First Aid fails to fix the external hard drive, your disk, unfortunately, is severely logically damaged. Formatting it will be your last choice.
Solution 3: Format the external hard drive to make it workable
When your external hard drive stops working, you cannot open the drive nor access the files but they are still stored on the drive. However, formatting the external hard drive will write a new file system and leave you a blank drive. In this situation, how to secure your important data?
If you have Time Machine backup or cloud backup, go ahead to format the disk. If not, you need a file data recovery tool for Mac to salvage the files on the external hard drive.
We choose iBoysoft Data Recovery for Mac as an example to illustrate how to get back files from a not working external hard drive with data recovery software. iBoysoft Data Recovery for Mac specializes in external hard drive file recovery. It can recover images, videos, music, documents and almost any other files from external hard drives.
Even though the external HDD is not mountable, readable, corrupted or formatted, the data recovery can be successfully achieved. Besides external hard drives, the software also works perfectly on data recovery from Macintosh HD, SD cards, USB flash drives, and other storage media. It is fully friendly to Mac desktops and laptops running macOS 10.15 to earlier versions until OS X 10.7.
Steps to get back important files from the external hard drive:
- Install and launch iBoysoft Data Recovery for Mac on your Mac.
If your Mac computer is running macOS 10.15, you will need to grant the full disk access to the software first because of the security requirement in macOS 10.15 (Catalina).
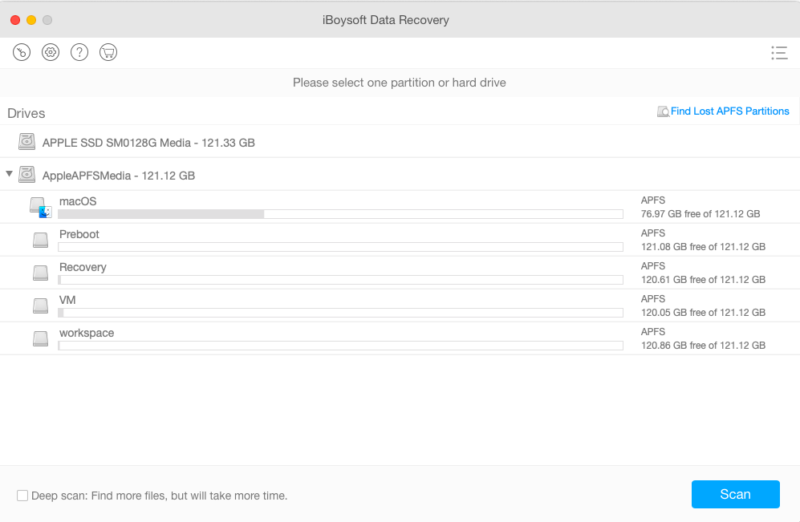
- Attach the external hard drive to the Mac and select it from the software’s drive list.
As mentioned before, make sure the connection is firm and the software can detect the drive.
- Check the “Deep scan” and click on the “Scan” button.
If the software you use has a deep scan option, remember to use it instead of a quick scan in this situation because it will find all lost data for you. It will take hours to scan the external hard drive especially when there are a great number of files on it. Don’t exit the software and shut down the computer halfway.
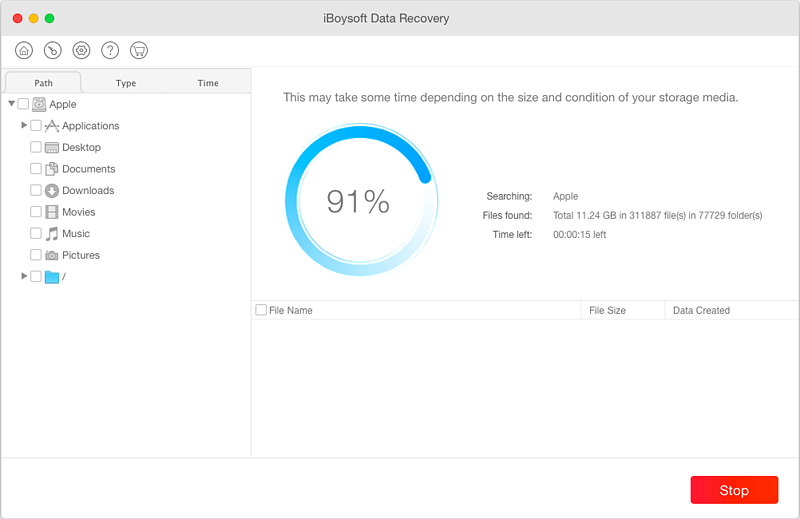
- Preview the found files.
It is common that the software ends up finding thousands of files on the external hard drive. Pre-recovery previewing will help you find the wanted and recoverable files fast.

- Select the files and click on the “Recover” button.
If you want to restore the files to another disk instead of on the Mac, remember to attach another hard drive with enough storage capacity to the Mac. Then select the disk as the saving path for the recovered files.
If you have an adequate backup or have recovered all important files from the external hard drive, you are good to go with the formatting in Disk Utility.
- Select the non-mounting external hard drive.
- Click on “Erase” in the toolbar.
- Enter a name and choose a file system and a Scheme.
- Click on the “Erase” button.
You have to admit that formatting works amazingly to fix disk problems. After you detach and reattach the external hard disk, it should be back to normal.
Conclusion
We hope this post can help your external hard drive work properly on your Mac. In case the external hard drive suddenly gets corrupted again, remember to back up important files regularly.