
Last Updated on February 27, 2024
The graphic design industry is tough. No matter where you go, you’ll see amazing talent through the work of other designers in the field. Some may apply styles that are similar to yours, while others use a very unique approach, making them truly one of a kind. Regardless of how many people do the same work that you do, it’s always about knowing how to make your own work shine over everybody else’s.
So how do you get people to notice your work?
It’s not about following trends – this could lead to you losing your personality. It’s not about doing the outrageous each and every time either – this could cause you to go astray from the project’s goal.
It’s all about how you display your work and give people the chance to discover and appreciate it. And this is what you can do with a great graphic design portfolio.
Creating Your Own Graphic Design Portfolio The easy way.
Every designer knows that they need a portfolio, an actual exhibit of the kind of work that they do. It’s an entry point into the big leagues, your first step before you start getting noticed.
Despite the obvious need for a graphic design portfolio however, a lot of designers still find themselves putting it off. Most of the time, the idea alone of putting together a solid portfolio seems tiring and complicated, causing designers to back out even before they begin.
Guess what. It doesn’t have to be hard. It’s not that complicated either.
All you need is 20 minutes, and you can be on your way to having your very own portfolio.
So where do we start?
Step 1. Sign up for a BlueHost plan.
BlueHost is one of the best hosting services around, powering up over 2 million websites all over the world. What makes them really popular in so many circles is the fact that they make WordPress hosting so easy.
Go to the BlueHost website and choose the plan that suits your need the most.
As you can see, the most popular option that people take here is the Plus plan. Assuming that you want to make the most out of your subscription, then that would probably be the best option for you as well, unless you feel that paying $6.95 each month seems pretty steep to you considering that it’s something new for you.
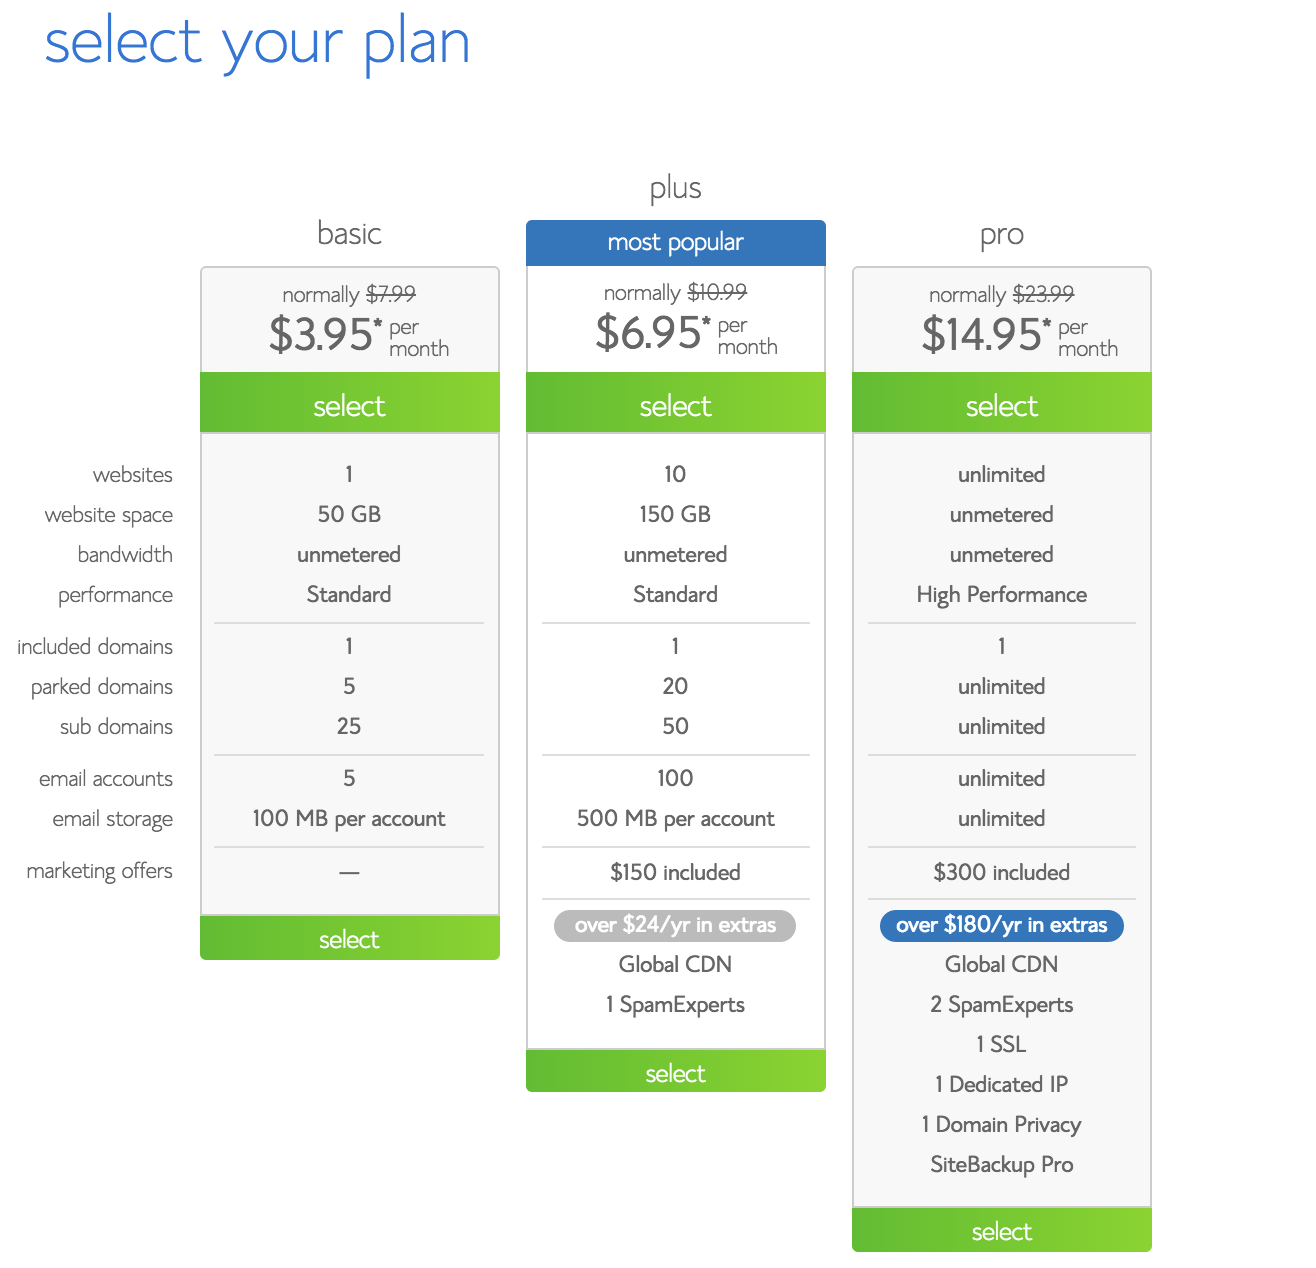
If that’s the case, then you could always go for the $3.95 a month Starter plan, but you have to remember that it has quite a few limitations.
Once you have chosen the right plan for you, figure out what domain name you want to use. Here are 19 domain name generators to help you.
Now if you choose a domain that someone else has used, obviously, the system will not allow you to continue the process. However, if the domain name is still available, you will now be led onto the signup page.
Start off with your account information.
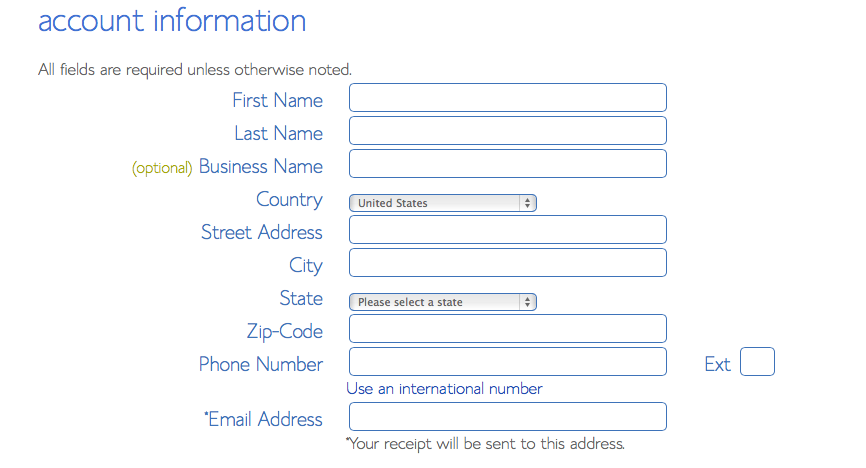
Note that the only optional field here is the Business Name, so please make sure that you have every space aside from that filled out. Double check all the information you supply, making sure that all the information is accurate.
You should also make sure that the email address you use here is currently in use (and not some backup email you use to avoid spam on your official email). Your official receipt is going to be sent to this email, and that’s definitely something that you’d want to keep in your files.
Once you have filled out the required fields under Account Information, you can now move on to Package Information.
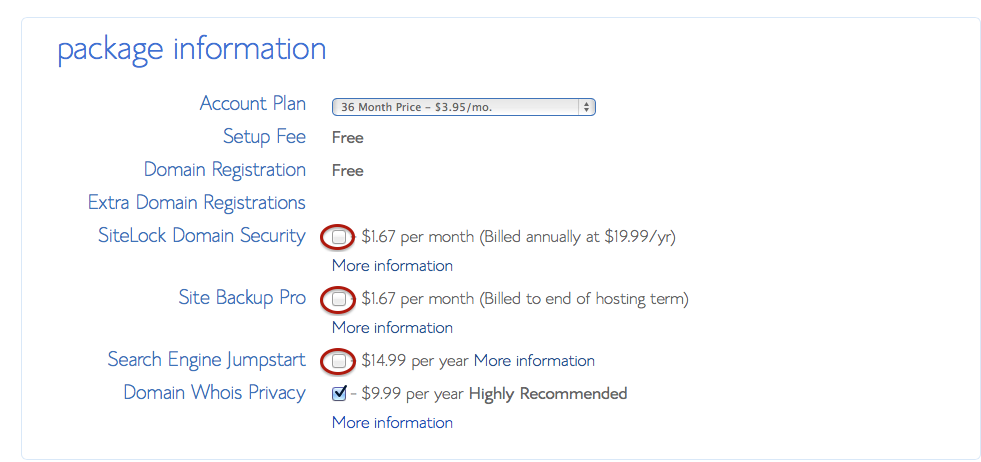
As you can see, there are a few add-ons that you may want to check out, like Domain Privacy Pro and Site Backup Pro. Again, signing up for these would depend on your immediate need. So if you feel that these are for you and you think that the pricing is fair enough, then go ahead and tick the boxes right next to your choices.
Are we good so far?
Good, let’s continue.
Now we’re moving on to your billing information, so from here, we’re going to lock and load this thing into the system once your payment goes through.

Although you can only see one option for now, which is to pay by credit card, you can actually click on that small blue link that says “More Options”.
Once you do that, you will see another option coming out, which is to pay via PayPal.
Once you have chosen the right payment method and have placed all the required details, tick the box that states that you agree with the site’s terms and conditions. From here, you can go ahead and click on that green button that says “Submit”.
Congratulations!
You are now the proud owner of your own domain hosted by BlueHost!
Step 2. Install WordPress.
Now that you have a hosting service, it’s time to set up the heart of your website. Your WordPress software.
WordPress is a blogging platform. It’s where you put everything in, from text to images. It powers up around 25% of all the websites you see online, so you can just imagine how wide their scope is.
And now, you’re going to be part of that statistic.
So remember that registration process we went through earlier for BlueHost? Now’s the time to use it. Here, you will also realize how easy it really is to integrate your WordPress into your hosting service. So if you already have an existing WordPress account, then you can definitely bring that into the picture.
Log into the BlueHost account that you setup earlier.
Once you’re logged in, you can find a section called Website Builders.
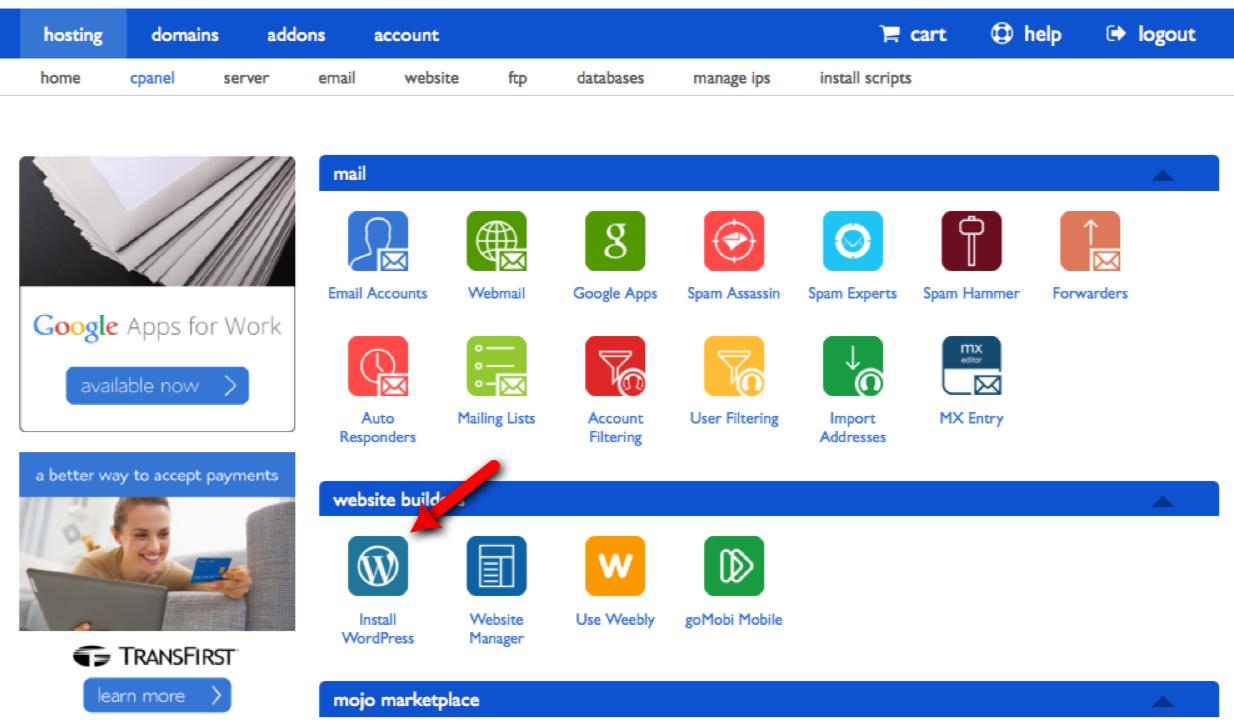
You will see the WordPress logo here. Click on it. This should lead you to a page that allows you to install WordPress.
Go ahead and click on the green “Install” button under “Do it yourself”. Don’t be afraid to do this on your own. Aside from the fact that doing it yourself makes it absolutely free, this is a very simple process that you don’t need to be daunted about.
On the next window, you will be asked for your domain name.
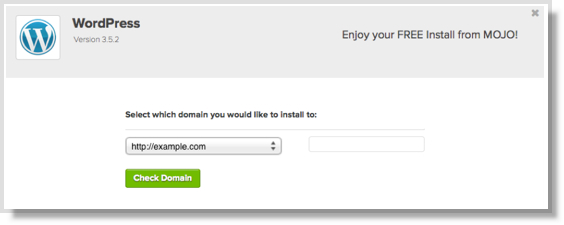
Choose your domain name and the click on the green button that says “Check Domain”.
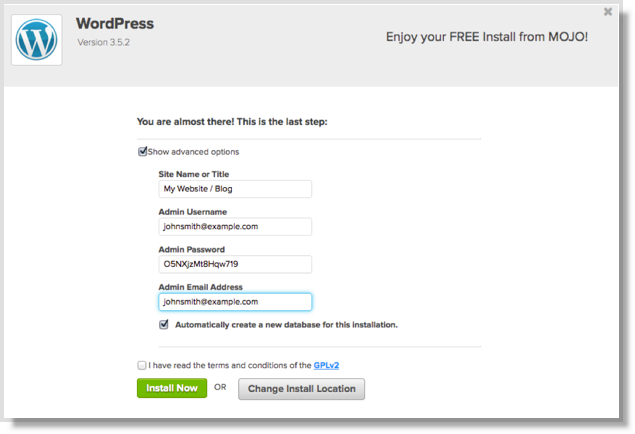
After that, you’ll see the final step. Just tick the box that confirms your acceptance of the terms and conditions, then click on the green button that says “Install Now”.
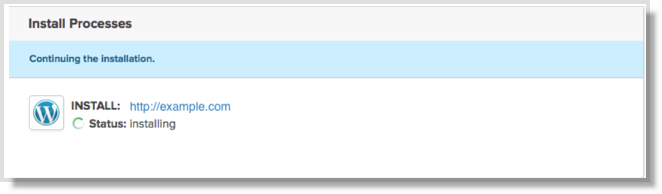
The installation itself should be very quick. Before you know it, you’ll see a message that says, “Your install is complete!”
From here, look for that button on the upper right corner that says, “View Credentials”. Take note of the Admin URL, Username, and Password that will be given to you by default. Sure, it’s going to be a bunch of random characters and symbols for now. Don’t worry though, because you can always personalize these details later.
Now, open up a new tab on your browser. Type in your Admin URL. This will lead you to a WordPress login page like this one:
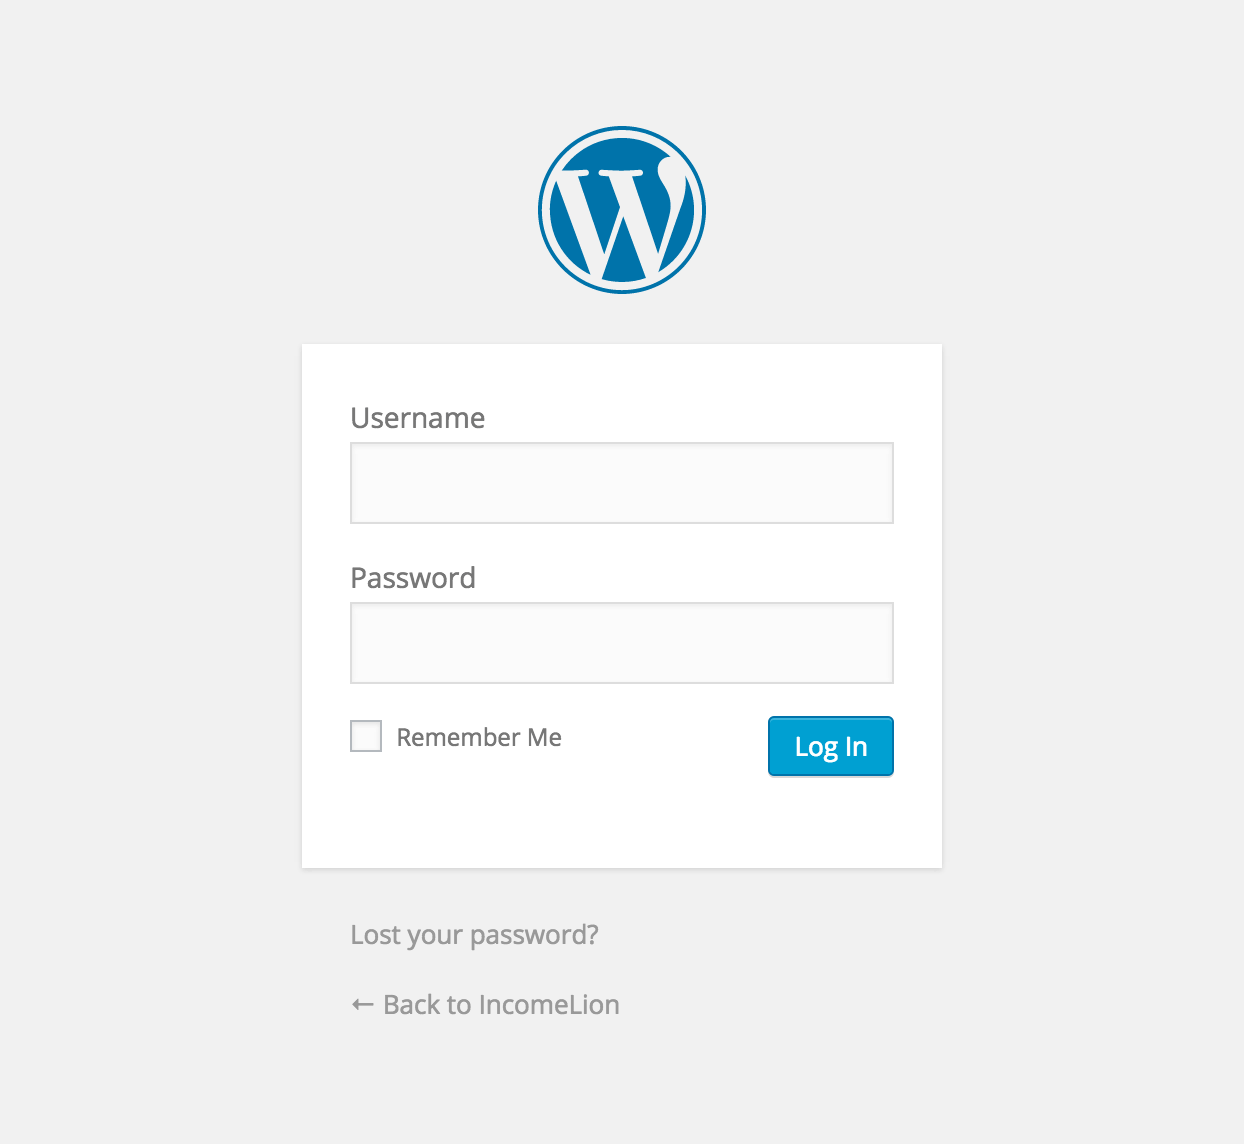
Type in the username and password provided to you earlier. And there you have it! You have officially logged into your soon-to-be-official portfolio for the first time!
Step 3. Personalize your portfolio.
You’re a graphic designer, so you have no right to launch a boring portfolio. Otherwise, would it be right to call you a great designer?
I didn’t think so.
A HUGE part of your portfolio’s success (and your own success, as well) is in creating a captivating experience for all your audiences. This is why you need a theme.
There are so many places where you can buy amazing themes.
“I’m sorry, did you say BUY?”
Yup, that’s exactly what I said. Buy.
Sure, there are a lot of free themes that you can use. It’s your portfolio after all, so it’s up to you whether you want your pages to be just like every other website out there.
If you want an amazing portfolio however, one that really captures who you are as an artist in every possible way, a little investment is in order. Free themes are accessible to all, which means that even if you do see a few decent designs, it would also mean that a dozen or two of your competitors would probably be using the same theme.
For you to be different, for you to excel, and for you to create that lasting impression, here are a few places where you can buy amazing themes that would portray your personality and identity in every possible way.
Creative Market
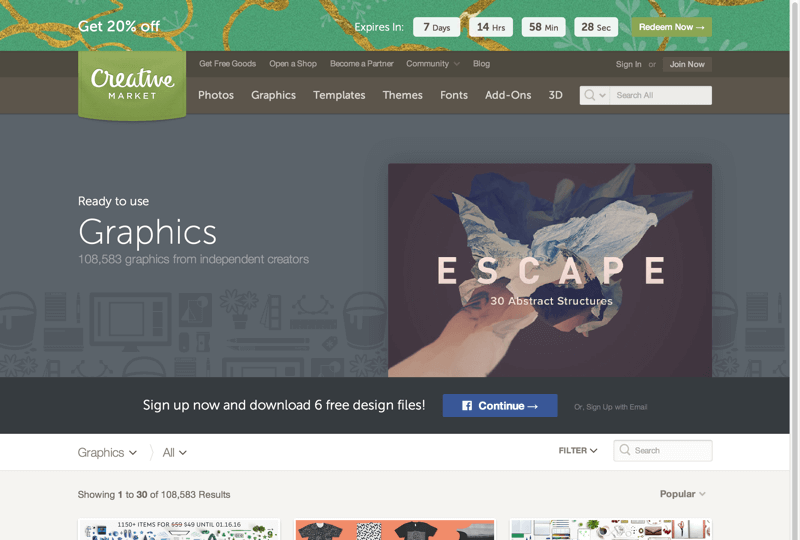
I love Creativemarket. It a very warm and friendly community of creatives. I love shopping there because you know you’re supporting numerous independent artists from around the world. I also have my own shop on Creativemarket. For the most part I tend to sell stock photos there.
Elegant Themes
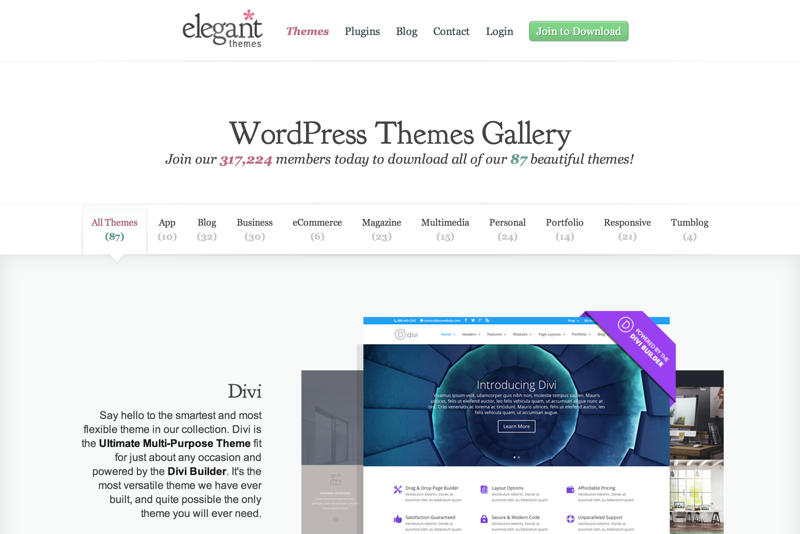
Elegant Themes has over 317,000 members and, as of me writing this, 87 Wordpress themes. Membership is around $69 a year. Which means you get all their beautiful themes for only $5.75 a month. You can also upgrade to their Developer plan and get access to their plugins. I love their plugins, especially Monarch, I’m currently using it for Inspirationfeed (Scroll to the end of the article and you will see the share icons).
Themeforest
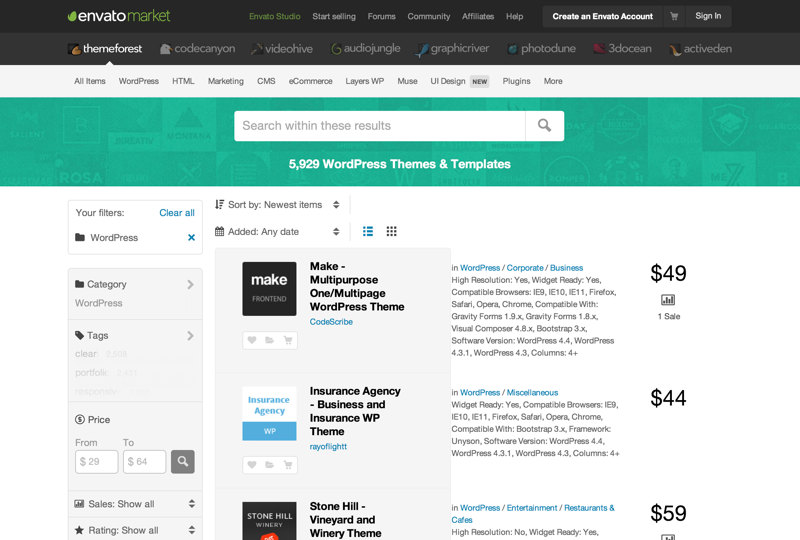
You can’t leave out Themeforest, because it’s basically THE place to be if you sell Wordpress themes. They have over 5,900+ WordPress themes & templates. Be careful, you can easy lose hours browsing the themes.
ThemeFuse

Themefuse doesn’t mess around when it comes to attention to detail. Their themes are top notch and should cost even more than what they currently sell for. If you only need one theme for a specific niche like blogging, e-commerce, or photography, I would suggest just buying a single theme that you like. But if you know that sometime in the near future you will create more websites, might as well sign up for their $195 yearly plan so you get access to all of their themes.
Prices vary depending on the theme that you choose, but one thing’s for sure. Using a theme that you actually purchased, instead of downloading theme for free, will definitely give your portfolio a more professional vibe.
Step 4. Making Your Portfolio Stand Out

Great! So you are now convinced that you definitely need to get started on this. There is also a possibility that you’ve gone ahead and started working on it.
Now, it’s time to figure out how to make it stand out. The last thing you want is for your portfolio to be so generic that potential clients and employers just scan through it and leave it alone.
Here are a few tips on how you can make your portfolio so powerful, that clients won’t be able to say no:
Turn it into a compelling story.
These days, people aren’t just interested in the final results. Knowing how you came up with those results also matter a lot.
Because of this, it’s important not just to display your work. It’s important to tell the story behind it as well. After all, who doesn’t enjoy a good story?
Talk about your inspiration for each specific design. Tell people about the challenges you encountered in the creative process, and talk about how you ingeniously found a solution.
You can even share how many revisions you had to go through, and how many times you had to start from scratch. Nope, this doesn’t show that you’re an artist who has the tendency to run out of ideas, this happens to everybody. What’s important for clients to see is that you know exactly what to do when this happens, and you can actually make something good come out of any situation.
Choose designs that matter to you.
More often than not, some of a designer’s best work are those where they poured out their hearts and souls into it. These are the projects that are done not just because of the money involved. These are the projects done because the goal is aligned with your own vision.
Choosing designs that matter to you the most will be a great way to make your mark about who you really are as an artist.
Choose your best work.
Of course, your work closest to your heart may not be your best. Your first ever work as a design student, for example, would probably be something that you’re sentimental about.
But knowing that you still had so much to learn when you worked on it means that there’s a chance that it probably had a lot of room for improvement. Unfortunately, potential clients won’t care.
Exhibit nothing but your best work. It doesn’t matter what you had to go through for you to make them, just as long as you came up with amazing results. Find the ones that you know will grab the people’s attention the first few seconds. The ones that you know will close the deal even before you start talking.
Keep it updated.
Every single time you make any changes that impact your career, it’s automatic for you to tweak your resumé so that those changes can be reflected.
Well, you should do the same thing to your graphic design portfolio. Every time you finish a project that you believe outdoes the old ones you have on display, then by all means, add that to your exhibit, or use it to replace one of the designs on display. After all, if you know for certain that this design is going to knock potential clients’ socks off, then what good reason could you possibly have not to let it do the work for you?
Focus on what you do best.
Every artist has an area that they specialize in. Some make awesome logos. Some do great work in web design. Some create inspiring typography.
Whatever it is that you do best, make sure you highlight it on your portfolio.
Sure, you could say that you’re great at everything you do. But you know what? There’s sure to be one area where you find the work more effortless than the others.
It’s up to you on how you’re going to highlight it. What’s important is that it’s the first thing that visitors would see the moment they land on your pages.
Put a lot of work into optimizing your portfolio.
When we say optimize, it means that you have to make it easy for people to find it when they look for anything within your field. Make use of relevant keywords throughout your portfolio so that people who are searching for, let’s say, the best logo designer in Chicago will see your portfolio in the first or second page of Google’s search results.
Pay attention to how it loads as well. This portfolio is definitely going to be filled with heavy images, so there’s a huge chance that pages will take some time to load. But this might make visitors impatient and could cause them to move to a different page because they don’t want to wait.
There are so many ways for you to use those images in the highest possible quality without sacrificing the speed at which the pages load. Make the most out of those opportunities.
Ask for feedback.
Always ask people for feedback about your work and about the general feel of your portfolio. Sure, it has to be about who you are as an artist and what your vision is.
However, this portfolio is meant to be viewed and appreciated by other people. And when the only person who thinks that your portfolio is pretty cool is yourself (or your mom, perhaps), then there’s something wrong here.
Encourage people to give you feedback. And don’t just get feedback from your peers. Peers may have the tendency to become biased. Sometimes, they may also tell you only what you want to hear, which, sometimes, may be far from the truth. Get feedback from influencers in the industry, from people whose opinions you know actually stand for something.
These feedback will not only help you improve on your portfolio. These feedback will also help you improve as an artist overall.
Graphic design is a tricky business, but it’s all worth it the moment you start reeling those clients in with your portfolio. It’s all about having the confidence to start getting your work out there and making the world discover how huge the difference is between good graphic design and amazing graphic design.
5 Reasons Why You Should Start Your Portfolio This Very Minute
Okay, so you have the ‘time-consuming’ part of the process out of the way. In fact, we actually eliminated the myth that creating these things take forever to do.
So what else is stopping you?
Here are 5 compelling reasons why you need to get started on that portfolio right now:
1. It displays your work.
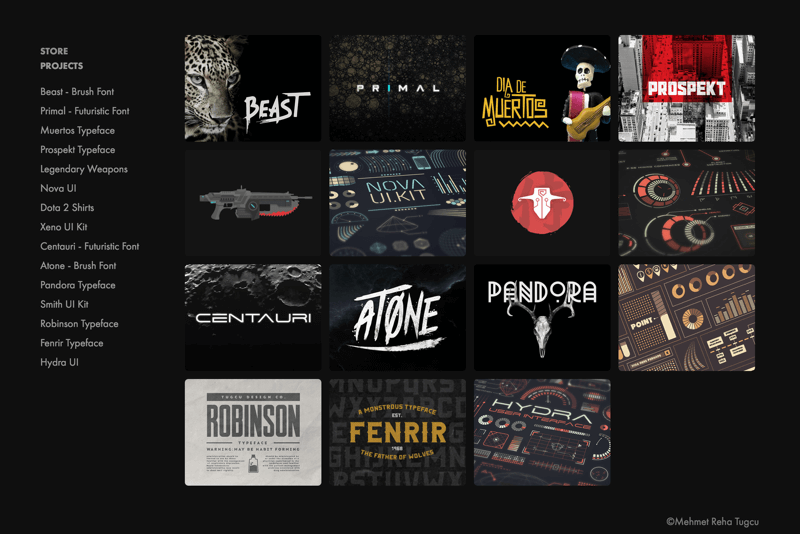
Portfolio of Mehmet Reha Tugcu
As a graphic designer, you have to remember that you are the brand, and your work is your range of products. You can’t possibly sell your products if you do not put them up for display now, can you?
This is why you need a graphic design portfolio. It’s the best way for you to highlight your best work and show the world what you can do.
2. It shows who you are as an artist.
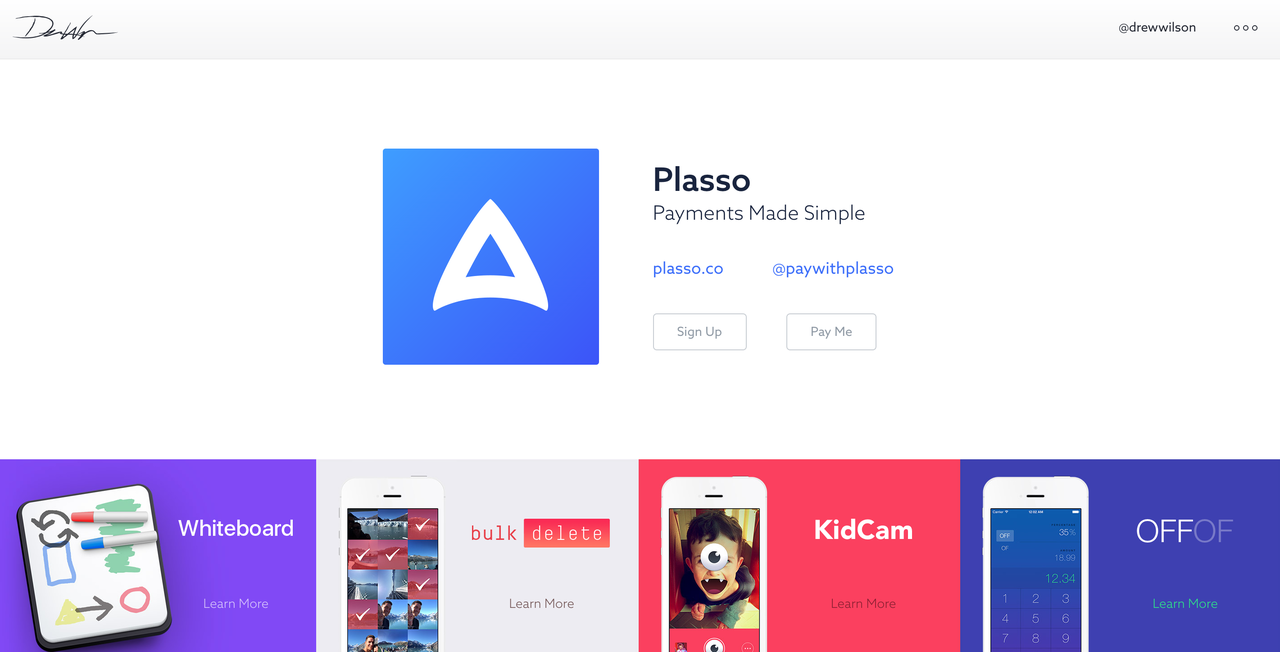
Portfolio of Drew Wilson
As we mentioned earlier, each designer has their own style, their own approach, their own signature. Do you have a favorite designer? I bet you can spot any of their work from a mile away without even having to double check whether they signed it or not.
This is precisely what your portfolio is for. Your design portfolio can show people who you are as an artist. And should you reach that career peak where people acknowledge you as being an influencer, those designs that you have in your portfolio would probably be recognized by future budding artists in the same way.
3. It makes you more credible.
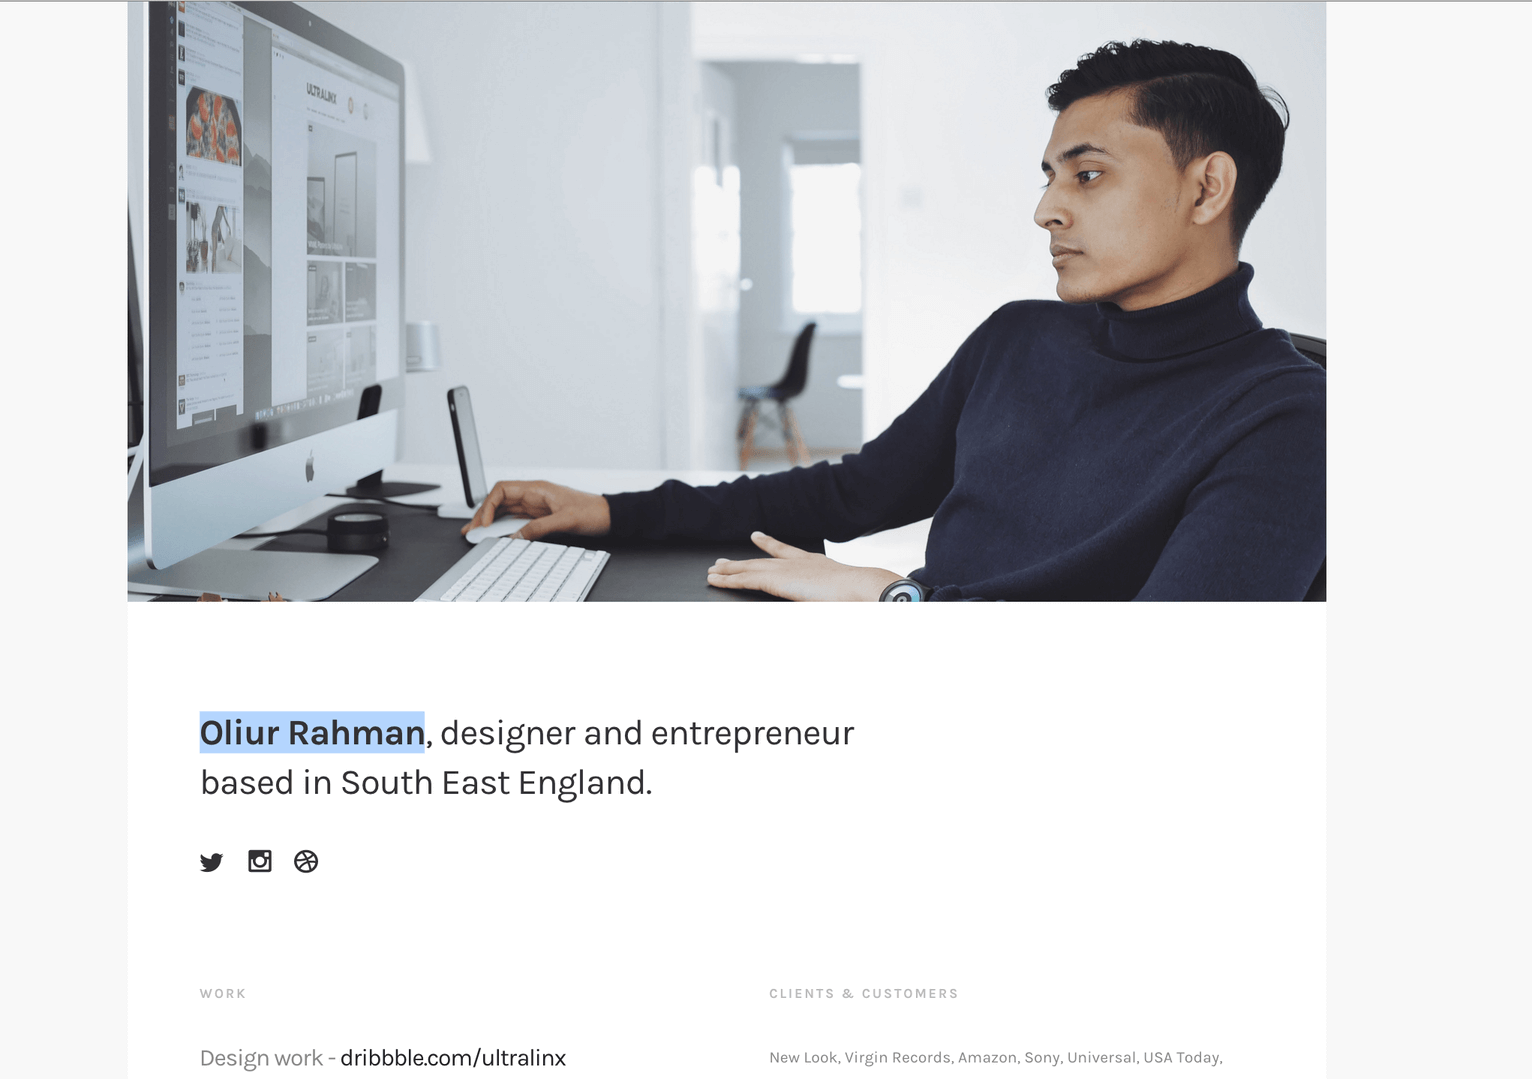
Portfolio of Oliur Rahman
Anybody can claim that they’re a great designer. But only those who can really support that claim can be credible enough to be considered by potential clients for their project.
Through your design portfolio, you get to show potential clients that you really have the skills that you claim to have. After all, it’s easy to talk – but it’s your ability to walk the talk that matters.
4. It shows if you are the right person for the job.
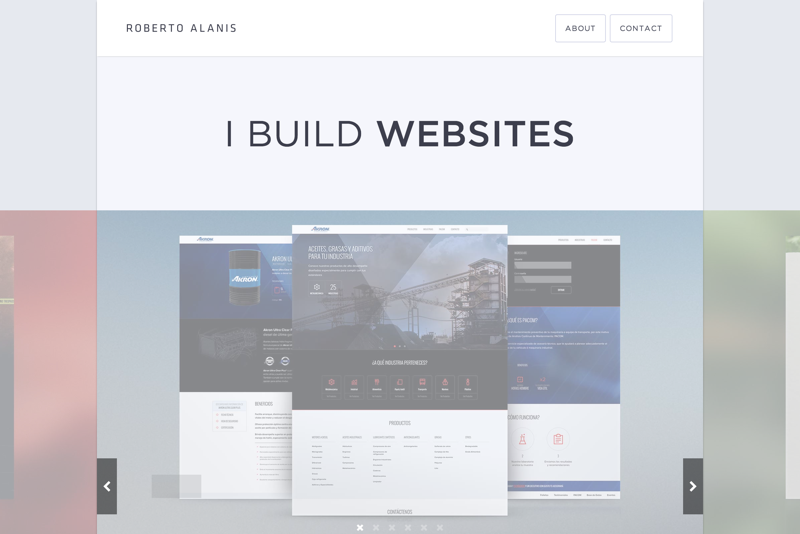
Portfolio of Roberto Alanis
Nothing beats the feeling of working on a project that you know was meant for you. It requires a style and approach that matches exactly what you do, and the project’s vision could be something that matches your own as well. It’s a match made in heaven.
On the other hand, there are also times when you know that a project will only hurt your name instead of add value to it. The client may be looking for something entirely different from what you do, or your client may want you to change your approach a little just to fit what he needs. This could also waste a lot of your time, knowing that the client is never going to be happy with what you have to offer.
If you have a solid portfolio to present, it’s easier for potential clients to see if you’re the person for the job or not.
5. It helps you bring in more feedback.
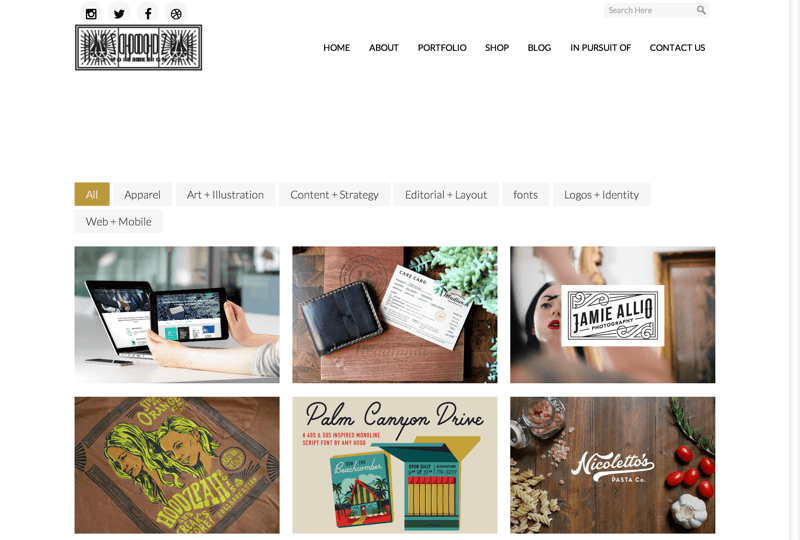
Portfolio of Any Hood
Feedback, both good and bad, can help you as an artist. Good feedback could give you the confidence that a lot of new designers lack, while negative feedback could show you what areas you still need to work on.
With your work on display for everyone to see, you could easily be a magnet for feedback. And this feedback, when used the right way, can push you to become the best designer you could be.
Let your portfolio do the taking for you. There’s no better time to start than now.
Timer all set?
Good.
Your 20 minutes starts now.